Brief Project Description:
Measuring your world was a project we did in 10th Grade Math. In this project we learned basic trigonometry, Pythagorean theorem, and area and volumes of several different shapes. At the end of the project we created a project that involved distance, area or volume and completed the project.
1 - In Depth Math Content:
At the beginning of the project we refreshed our learning of Pythagorean Theorem. We learned that if you have two side lengths of a triangle you can find the third side by using the following formula: a^2+b^2=c^2, a b and c corresponding to different sides of the triangle. We next learned about the distance formula. This formula can tell you the distance between two points on a coordinate plane. The formula is as follows:

This formula was derived for the Pythagorean Theorem, as follows:
If we pick two random points on a coordinate plane and want to find the distance between them we can draw straight lines until the points intersect at a 90 degree angle and connect the other points together to form a right triangle. We can then label our sides as follows:
If we pick two random points on a coordinate plane and want to find the distance between them we can draw straight lines until the points intersect at a 90 degree angle and connect the other points together to form a right triangle. We can then label our sides as follows:
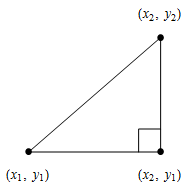
And then to this because to find the lengths of the sides we can take the absolute value of the differences in coordinates.
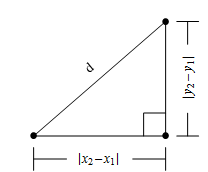
The Pythagorean Theorem says the a^2+b^2=c^2 so if we substitute x2-x1 for a and y2-y1 for b because they are corresponding sides, we get this: (|x2-x1|)^2+(|y2-y1|)^2=d^2.
We can next simplify this equation by removing the absolute value signs, and squaring both sides and we get:
We can next simplify this equation by removing the absolute value signs, and squaring both sides and we get:

A The distance formula!
From then we moved onto the area of a circle. The equation is x^2+y^2=r^2. Using this equation you can determine if a point is on the circle, inside the circle, or outside the circle. Next we moved on to the unit circle. The unit circle is a circle with a radius of 1, so its equation of a circle is x^2+y^2=1. The unit circle shows you right triangles and there x's and y's given an angle. This makes math easier because if you see a triangle with a right angle and a 60 degree angle you can instantly know it's side lengths. A picture of the unit circle is to the left. The unit circle is also a very nice way to use the Habit of a Mathematician, Staying Organized.
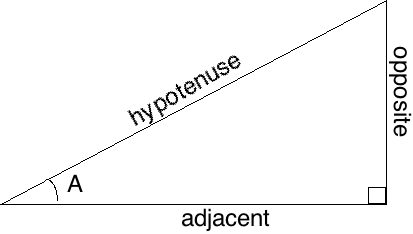
From here we moved into the main portion of this unit, right triangle trigonometry. We first learned the different sides of a right triangle. The easiest side to identify is the hypotenuse, it is always across from the right angle. The adjacent is always adjacent to the right angle. The opposite is always opposite of the right angle, or the one left. What I have just described is below.
From then we moved onto the area of a circle. The equation is x^2+y^2=r^2. Using this equation you can determine if a point is on the circle, inside the circle, or outside the circle. Next we moved on to the unit circle. The unit circle is a circle with a radius of 1, so its equation of a circle is x^2+y^2=1. The unit circle shows you right triangles and there x's and y's given an angle. This makes math easier because if you see a triangle with a right angle and a 60 degree angle you can instantly know it's side lengths. A picture of the unit circle is to the left. The unit circle is also a very nice way to use the Habit of a Mathematician, Staying Organized.
From here we moved into the main portion of this unit, right triangle trigonometry. We first learned the different sides of a right triangle. The easiest side to identify is the hypotenuse, it is always across from the right angle. The adjacent is always adjacent to the right angle. The opposite is always opposite of the right angle, or the one left. What I have just described is below.
Next we learned the trigonometry formulas cosine, sine, and tangent.
Cosine of Θ=Opposite/Hypotenuse
Sine of Θ=Adjacent/Hypotenuse
Tangent of Θ=Opposite/Adjacent
Θ is theta, it means the angle that you are going to use to find your side length. Cosine, Sine and Tangent are all buttons on a calculator. Lets try this practice problem.
Cosine of Θ=Opposite/Hypotenuse
Sine of Θ=Adjacent/Hypotenuse
Tangent of Θ=Opposite/Adjacent
Θ is theta, it means the angle that you are going to use to find your side length. Cosine, Sine and Tangent are all buttons on a calculator. Lets try this practice problem.
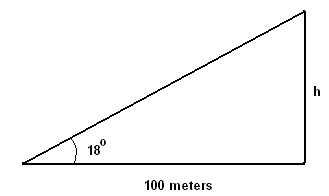
Say on the problem above we want to find h A.K.A the opposite side. We first need to pick an angle as Θ. We know the angle 18 degrees so that will be our theta. We know the length of the adjacent side, and we want to know the opposite side, so the trig function that involves opposite and adjacent is tangent. Because tangent of Θ = O/A we can write it like this: tan of 18°=O/100. Now we can solve for the opposite side by doing some algebra, we can multiply both sides by 100 to get: 100*tan of 18°= O. Now just take out a calculator and multiply the tangent of 18° by 100 to get h, which is around 32.5 m. Make sure your calculator is in degrees mode, and not radians, or else all your math will be off.
After trigonometry we learned to find the area of polygons, usually regular polygons. We learned the formulas to find the areas of a square and triangle witch are l*w and 1/2*b*h respectively. Using this information we were given shapes such as pentagons and hexagons that we could take apart into several equal triangles and use trig to solve for there heights. One you knew the triangles heights you could find there area, and then you could multiply the area of one of the triangles by how many triangles there is in total. In the problem described above we had a perimeter of 300 to work with, and we also solved similar problems where we had to find the area of a square, triangle, and hexagon, all with perimeters of 300. As we moved to shapes with more sides we realized that the areas were getting bigger and bigger. Here we used the Habit of a Mathematician, Looking for Patternes to find this pattern: that the more sides a shape has the higher the area is, and a circle has infinite amounts of sides so it also has the highest area. We also saw that the more sides a shape has the more it begins to look like a circle. The equation to find the area of a circle is pi* r^2.
Next we moved onto volume. We learned that area was two dimensional it has length and width, but area has another dimension, height. We started with prisms, and we learned that prisms are three dimensional shapes that have the base of a shape of both sides. If we wanted to find the volume of a rectangular prism (the 1st shape in the slideshow below) you have to multiply the height by the width by the length, or v=l*w*h. If you think about it we are finding the length of the base and stacking the base up until it reaches the top. For other types of prisms (the second picture in the slideshow below) you have to find the area of the base and multiply it by the prisms height, or V=Abase*h. After prisms we learned about pyramids. (like the ones on the third picture in the slideshow below) These shapes form an apex at the top of the shape, or the point where all the ends of the pyramid meet up. If you want to find the volume of a pyramid the formula is V=1/3*Abase*h. We earned that this formula was derived from some cool cutting of a cube to make three identical pyramids, that's where the 1/3 in the formula comes from (4th slideshow picture)
2a - Volume Project Description:
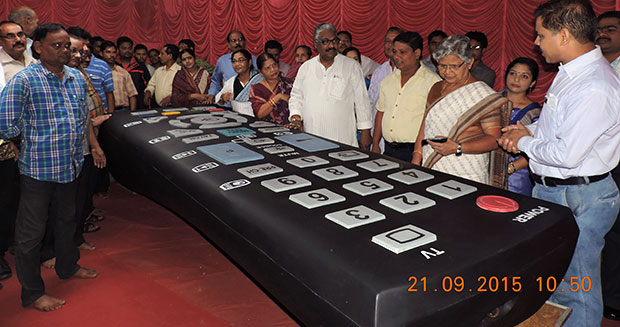
Another portion of this project was creating a project to do that had something to do with distance, area, or volume. We each created project descriptions for what we were planning on doing and then actually carried out the project. What me and another person decided to do was find the volume of the worlds largest volume button on the worlds largest T.V remote. The remote is 14.75 ft long and is fully functional! (to see more go here: http://www.guinnessworldrecords.com/news/2016/1/video-indian-brothers-build-14-ft-tv-remote-control-and-prove-it-actually-works-411614) The official Guinness World Records have recognized this as the worlds largest T.V remote. The website did not say the actual size of the volume button, however it did say the scale factor that the remote is to its original size. Because of that we decided to take a remote that looked similar to the one in the picture below and measure its length, width, and height and multiply each side by the scale factor. See the math below.
Another portion of this project was creating a project to do that had something to do with distance, area, or volume. We each created project descriptions for what we were planning on doing and then actually carried out the project. What me and another person decided to do was find the volume of the worlds largest volume button on the worlds largest T.V remote. The remote is 14.75 ft long and is fully functional! (to see more go here: http://www.guinnessworldrecords.com/news/2016/1/video-indian-brothers-build-14-ft-tv-remote-control-and-prove-it-actually-works-411614) The official Guinness World Records have recognized this as the worlds largest T.V remote. The website did not say the actual size of the volume button, however it did say the scale factor that the remote is to its original size. Because of that we decided to take a remote that looked similar to the one in the picture below and measure its length, width, and height and multiply each side by the scale factor. See the math below.
2b - Volume Project Math:
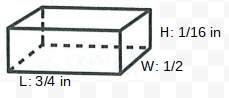
The dimensions of the volume button that we measured at school are as follows:
The dimensions of the volume button that we measured at school are as follows:
|
The scale factor of the remote that the biggest one in the world was scaled up from is 23.68 times bigger. Our next step was to take our lengths and multiply all by the scale factor to get approximate lengths for the volume button on the worlds largest remote. My work is to the right. The first button on the slideshow is my calculations for length, second for width, and third for height. The fourth slide on the slideshow is a diagram of the approximate lengths of the worlds largest volume button.
I next looked at the formula for finding the volume of a rectangular prism witch is l*w*h. So because the volume button is a rectangular prism I plugged the length, width, and height into the formula to find the volume of the worlds largest volume button. My calculations are on the fifth picture on this slideshow. The answer I got was: 311.212032 inches cubed. 2c - Volume Project Reflection: I thought that I made this project a little to easy. I finished my calculations in around three minutes, I should have at least done something that I had to take apart a little, and use other, more complicated volume equations. I did learn something when I did this project. I thought that you could find the volume of the original volume button that we measured and multiply that by the scale factor but that didn't work. If you do that you get 0.555 inches cubed, witch I thought was way to low so I redid the math like I did above. I'm not sure why this didn't work and I still don't really know. A Habit of a Mathematician that I used in this project very well was starting small. I started small on the small remote, and then scaled up to think about the large remote. |
|
3 - Whole Unit Reflection
In this project I learned a lot. The things that we learned about in this unit that I did not know before were: the distance formula, the equation of a circle, sine, cosine, and tangent functions, right triangle trig, and some of the volume formulas. That's a lot of stuff that I feel I have a pretty good grasp on now. All throughout this project I was using all of the Habits of a Mathematician all the time, and i'm going to explain how I used all of them in these past weeks.
Look for Patterns: I looked for patterns in the Corral Problems and found that the more sides you have the more area you get, a circle has the most area, and the more sides you add to a shape the more it looks like a circle.
Start Small: I started small in my Volume Project, I began with a small remote, and then moved up to a larger remote.
Be Systematic: I was systematic in the Geo board POW. I would increase the size of the shape by one, to see what that would affect.
Take Apart and Put Back Together: I took apart and put back together in the frustum volume problem. I cut the shape into a rectangular prism and four triangular prisms, because i knew how to find the volume of those shapes, but not a frustum. -
Conjecture and Test: I conjectured and tested around every SAT warm up that we did through this project. Whenever you are asked to find a relationship between several variables I always plug in numbers to try and see the relationship more clearly.
Stay Organized: I stayed organized in my volume project presentation. I made a math explanation sheet that was very organized and easy for everyone in my class to understand. I also think this presentation is fairly organized.
Describe and Articulate: I described and articulated throughout all of the volume problems. The problems that ask you to find the volume of a specific shape don't always give you a diagram. If they don't I have to draw one because it really helps my understanding of those projects.
Seek Why and Prove: I used seek why and prove when I wondered why you cant find the volume of the original volume button and multiply it by the scale factor in the Volume Project Reflection above.
Be Confident, Patient and Persistent: I was confident, patient, and persistent in all of the SAT warm ups. On at least one of the questions on all of the SAT warm ups we have done I don't know where to start so I just try something. Something it doesn't work, sometimes it does.
Collaborate and Listen (with Modesty): I used this habit when i did my volume project. I worked with another student in the class and I listened to his ideas.
Generalize: I generalized in the Geo board POW. I looked for patterns, and used those patterns to generalize for formulas.
A couple of struggles that I had in this project were simplifying square roots. I had never seen that before and it was incredibly challenging for me to understand. Another thing that was challenging in this project was understanding right triangle trig. At the beginning it made no sense, but after I practiced a bit it made much more sense.
A couple of successes I had in this project were understanding the volume formulas. I understood that to find the volume of more complex shapes you have to take them apart and find the volumes of those less complex shapes. Another success was the corral problems. These problems were challenging but in the end I was able to solve them easily.
Overall this project was a excellent learning experience for me and I enjoyed it greatly.
