Project Description:
In my opinion the purpose of this project was to review geometric translations such as transformations and reflection and introduce the idea of dilation. Another important part of this project was understanding the differences of similarity and congruence,
This project we started off with brainstorming what the class knew about similarity and congruence. We then we put into groups about six topics, and presented to the class. Most of the presentations were review but the main thing the presentations introduced us to was dilation. We then worked on some similar triangle review about proportions and what side lengths correspond to each other when triangles are similar. After that we expanded our knowledge of dilation by using a dilation technique with rubber bands. We worked on a couple more handouts about dilation, notably the Billy Bear handout witch taught the affect dilation has to distance and area. After that we were introduced into the part of the project that will be exhibited. We were tasked with finding anything and making a scale model of that thing. I decided to scale up a ruler. This process had a number of benchmarks, #1 being an idea of what you might want to scale and who you might want to work with. Benchmark #2 was the calculations of the object that you are going to scale. Benchmark #3 was the final product and a self or group assessment. Benchmark #4 is what you are reading right now!
Mathematical Concepts:
1: Congruence and Triangle Congruence:
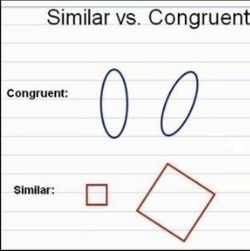
Congruence is when a shape is the same size and the same shape. Similarity (as explained in section 2) is different then congruence because for shapes to be congruent they most be the same size and the same shape, but for shapes to be similar all sides must be proportional and all angles must stay the same. A diagram illustrating this is to the right.
2: Definition of Similarity
The definition of similarity is when all sides of the shape are proportional and all of the angles are the same. I used this in Benchmark #2 & 3, when I was calculating how long the sides of my ruler will be, I made sure that I kept everything on it proportional. I used similarity in Benchmark #3 during the creation, for the same reason.
3: Ratios and Proportions
A ratio is a numbers relation to another number displayed with a colon in between the numbers. A proportion displayed a relationship between 2 figures. Ratios can display proportions such as 1:2 when the second item is 2 times bigger than the first, but I like using scale factors witch say the number that you multiplied all the sides by to make the figure proportional. For a 1:2 ratio the scale factor would be times 2. I used this when creating my ruler. The original size of ruler is 12 in by 1 in and I multiplied by a scale factor of 1.5 times. I did the math below.
In my opinion the purpose of this project was to review geometric translations such as transformations and reflection and introduce the idea of dilation. Another important part of this project was understanding the differences of similarity and congruence,
This project we started off with brainstorming what the class knew about similarity and congruence. We then we put into groups about six topics, and presented to the class. Most of the presentations were review but the main thing the presentations introduced us to was dilation. We then worked on some similar triangle review about proportions and what side lengths correspond to each other when triangles are similar. After that we expanded our knowledge of dilation by using a dilation technique with rubber bands. We worked on a couple more handouts about dilation, notably the Billy Bear handout witch taught the affect dilation has to distance and area. After that we were introduced into the part of the project that will be exhibited. We were tasked with finding anything and making a scale model of that thing. I decided to scale up a ruler. This process had a number of benchmarks, #1 being an idea of what you might want to scale and who you might want to work with. Benchmark #2 was the calculations of the object that you are going to scale. Benchmark #3 was the final product and a self or group assessment. Benchmark #4 is what you are reading right now!
Mathematical Concepts:
1: Congruence and Triangle Congruence:
Congruence is when a shape is the same size and the same shape. Similarity (as explained in section 2) is different then congruence because for shapes to be congruent they most be the same size and the same shape, but for shapes to be similar all sides must be proportional and all angles must stay the same. A diagram illustrating this is to the right.
2: Definition of Similarity
The definition of similarity is when all sides of the shape are proportional and all of the angles are the same. I used this in Benchmark #2 & 3, when I was calculating how long the sides of my ruler will be, I made sure that I kept everything on it proportional. I used similarity in Benchmark #3 during the creation, for the same reason.
3: Ratios and Proportions
A ratio is a numbers relation to another number displayed with a colon in between the numbers. A proportion displayed a relationship between 2 figures. Ratios can display proportions such as 1:2 when the second item is 2 times bigger than the first, but I like using scale factors witch say the number that you multiplied all the sides by to make the figure proportional. For a 1:2 ratio the scale factor would be times 2. I used this when creating my ruler. The original size of ruler is 12 in by 1 in and I multiplied by a scale factor of 1.5 times. I did the math below.

It ended up being 1.5 in by 18 in and looked like below.

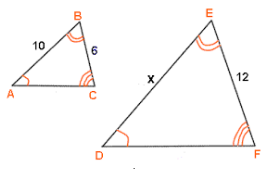
Another big thing we learned about proportions was how to solve them specifically with triangles. If we were tasked with solving x in the problem to the left, we could do that first by recognizing that these triangles are similar. We can tell these triangles are similar because all the corresponding angles are the same, as labeled in the diagram, A=D, B=E, and C=F. Now we need to recognize the corresponding sides. Side AB corresponds to side DE, Side BC corespondents to Side EF, and Side AC corresponds to side DF. Because these sides are corresponding we can set up a true equation to solve for x. 10/x=6/12 would work, as would 10/x=6/12. All that is left to do is solve the equation witch cross multiplication, or algebra and you would come out with an answer of 20.
4: Proving Similarity
There are two conditions to know if triangles are similar. The first condition is with the angles. If the corresponding angles are the same like they are in the picture above then the triangles are on there way to being similar. The second condition is that your pair of triangles have to have proportional sides. The sides of the triangles that are corresponding (as described in section 3) have to be multiplied, or divided if your scaling down, by the same scale factor. In the figure above, sides BC and EF are corresponding. And because 6*2=12 we know our scale factor is 2. That's why the x=20 because AB and DE are corresponding and because our scale factor is 2 and 10*2=20, x=20. You have to make sure all of the sides are multiplied by the same scale factor, if both of the conditions described above are true the triangles are similar.
5: Dilation
A scale factor is the number that all of the sides are proportional to. In the figure above the scale factor is *2 because 6*2=12 and 10*2=20. Dilation is a transformation that results in the same shape but a different size. That means the angles will stay the same but the length of sides will change. A dilation can be described as either a scale factor, or a center of dilation. A center of dilation is a point in space that all of the points will shrink or stretch from.
6: Dilation's Effect on Perimeter and Area
When a shape is dilated the perimeter will multiply the side by the scale factor.The area will be changed by the origional area multiplied by the scale factor squared.
Exhibition:
Benchmark #1:
In this benchmark we answered the following questions:
1. Who else is on your team?
2. What item/object are going to scale?
3. How are you going to decide on the scale factor?
4. How will your scale model be constructed and exhibited?
The purpose of this benchmark was to plan out our project and not just jump into something you weren't ready to do.
Benchmark #2:
In this benchmark we calculated how big the new object will be with the scale factor. My calculations are below. The purpose was to prepare so were ready to create the product, and create it right the first time.

Benchmark #3:
In this benchmark we created the product. We also completed a self/group assessment that asked if we made good use of our time and what grade we should get. The purpose of the first part was to understand the mathematics that we have been learning about, such as scale and dilation and put them all together in a meaningful product to display at exhibition. The second parts purpose was to make us reflect on what we could have improved on and what grade we think we deserve. (I need a picture of my product I don't have one on hand)
Reflection:
The most challenging thing about this product was choosing the scale factor. I had originally wanted to make a ruler very close to its original size, so dilated by a scale factor of around 0.95-1.05. But the problem was that once you would get down to the 1/8 of an inch the number would have around 5 decimals witch made it almost impossible to make accurate. So I decided to make my scale factor 1.5 times because it made the length exactly 18 inches witch was a lot easier to work with. The easiest part was actually make the product the right dimensions. Mike showed my how to use Adobe Illustrator and I laser cut a piece of wood to make it exactly the right dimensions. That was a great decision. I think I grew in conjecturing and testing. When I was finding my scale factor I was trying to find the right number of total inches that would make the 1/8 of an inch doable by hand, I conjectured and tested many different numbers. In then end I found 1.5 witch was the perfect scale factor.
